
Simplifying Web Development with HTMX: Dynamic Applications Using HTML Attributes
Discover HTMX, a breakthrough in web development that empowers developers to create dynamic applications using only HTML attributes. Dive into our comprehensive guide to learn how HTMX is revolutionizing the web development landscape.

Are you tired of the complexities and dependencies associated with JavaScript frameworks? What if there was a way to create dynamic web applications using only HTML attributes?
In this blog post, we’ll dive into the world of HTMX, a lightweight and dependency-free JavaScript library that simplifies web development and allows developers to create powerful web applications without writing complex JavaScript code.
In this post, we’ll explore its features, advantages, and how it compares to traditional JavaScript frameworks.
By the end of this post, you’ll have a solid understanding of “what is htmx” and be ready to unlock its potential in your web development projects.
Short Summary
- HTMX is a powerful JavaScript alternative for front-end web development, simplifying the creation of modern and responsive applications.
- HTMX extends HTML with additional attributes to facilitate dynamic behavior, AJAX requests, CSS transitions & animations without complex JS code.
- HTMX offers advantages such as faster development times & improved user experience compared to traditional JavaScript frameworks.
Understanding HTMX: A JavaScript Alternative

Imagine a world where frontend web development is simplified, and you no longer have to rely on complex JavaScript code to create dynamic, interactive web applications.
Meet HTMX!
HTMX is a dependency-free JavaScript library that empowers developers to create dynamic web applications using HTML attributes without the need for complex JavaScript code.
This innovative approach streamlines the development process and allows you to focus on creating rich and interactive user interfaces without getting bogged down in the intricacies of JavaScript.
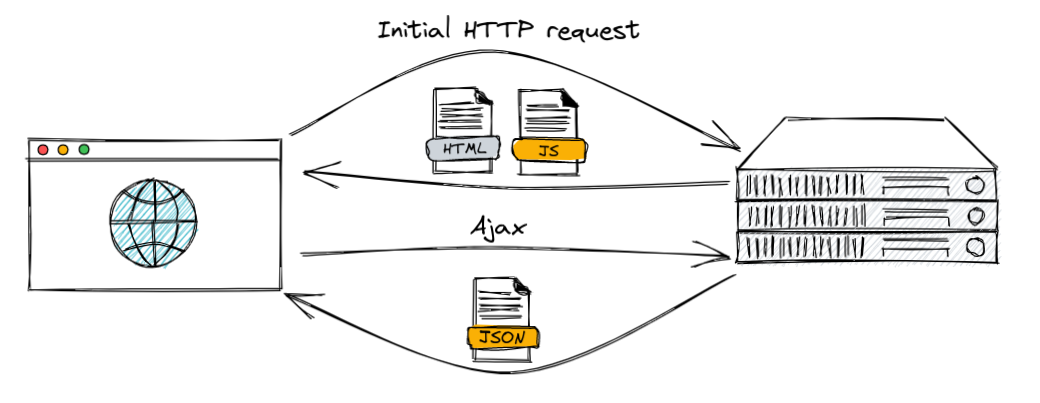
The beauty of HTMX lies in its ability to transform HTML into a dynamic powerhouse, enabling seamless client-server communication and real-time content updates.
This is achieved through the use of HTML attributes that facilitate HTTP requests, event triggering, and element targeting for content swapping.
In the following sections, we’ll delve deeper into how HTMX works and discover how it can revolutionize your web development process.
How HTMX Works?
At its core, HTMX works by extending HTML with additional attributes that provide direct access to:
- AJAX requests
- CSS transitions
- WebSockets
- Server-Sent Events
- And more others events
These attributes enable dynamic behavior within HTM.
Using a script tag not only simplifies the development process but also ensures a more lightweight and efficient application, as there is minimal reliance on JavaScript.
Directly within HTML, it allows developers to handle HTTP requests without writing JavaScript.
By providing a seamless platform for client-server communication and dynamic content updates, HTMX simplifies web development and offers a refreshing alternative to traditional JavaScript frameworks.
Setting Up and Installing HTMX
Getting started with HTMX is a breeze, as it offers multiple installation and setup options.
Depending on your preferred workflow and web development environment, you can choose to load HTMX via a Content Delivery Network (CDN), download the source file, or install it using npm.
Loading via CDN
One of the quickest ways to start using HTMX in your project is by loading it via a Content Delivery Network (CDN).
<script src="https://unpkg.com/[email protected]" integrity="sha384-zUfuhFKKZCbHTY6aRR46gxiqszMk5tcHjsVFxnUo8VMus4kHGVdIYVbOYYNlKmHV" crossorigin="anonymous"></script>Leveraging a CDN will benefit you with faster load times and improved performance, as the CDN will automatically serve your users the most recent version of HTMX.
Downloading Source File
If you prefer a more traditional setup, you can download the HTMX source file and include it in your project.
To do this, you’ll need to follow these steps:
- Visit the HTMX GitHub repository and click the ‘Code’ button to access the source file.
- Download the source code as a ZIP file.
- Extract the contents of the ZIP file to a location of your choice.
Now you have successfully downloaded htmx from GitHub! You can start using it by including the htmx JavaScript file in your HTML code:
<script src="/path/to/htmx.min.js"></script>Installing via npm
For those who prefer a more modern web development workflow, HTMX can also be installed via Node Package Manager (npm), the popular JavaScript package manager.
To install HTMX using npm, open a terminal or command prompt, navigate to your project's directory, and run the command:
npm install htmx.orgThis will automatically download and install the htmx library into your project, making it available for you to use in your code.
This approach offers seamless integration with contemporary web development processes and makes it easy to update and manage your HTMX package as needed.
Key HTMX Attributes for Dynamic Web Applications
Now that you’re familiar with HTMX and its installation methods, let’s dive into the key attributes that enable dynamic web applications.
These attributes allow developers to send AJAX requests, trigger events, and target elements for content swapping – all without writing complex JavaScript code.
AJAX Requests with HTMX
One of the most powerful features of HTMX is its ability to send AJAX requests directly from HTML elements.
This simplifies client-server communication and allows you to create dynamic web applications without writing complex JavaScript code.
By using HTMX attributes, you can easily send HTTP requests, such as GET, POST, or DELETE, to your server and receive responses that can be used to update your web application in real-time.
In particular, handling an HTTP POST request becomes a seamless process with HTMX, making it a valuable tool for managing HTTP request interactions.
For example, the hx-post attribute can be used to submit data to the server via a POST request, while the hx-get attribute can fetch data via a GET request from the server without manually managing AJAX requests.
Next, the hx-swap attribute allows you to change the content of an HTML element with a response from a server.
It is a useful feature when responding to user input. Similarly, we have other attributes like hx-put, hx-delete, and hx-patch.
Let's look at how to use HTMX attributes to send AJAX requests from HTML elements.
<form hx-post="/submit-form" hx-swap="outerHTML">
    <label for="name">Name:</label>
    <input type="text" id="name" name="name" required>

    <label for="email">Email:</label>
    <input type="email" id="email" name="email" required>

    <button type="submit">Submit</button>
</form>
AJAX request example using hx-post
In the example above, we have a form with two input fields for name and email and a submit button.
When you fill in the form and click the "Submit" button, HTMX sends the form data to the server without requiring a full page refresh.
The server processes the data, and HTMX updates the entire page content with the server's response. You can learn more about AJAX requests here.
Triggering Events
Another key feature of HTMX is its ability to trigger events using HTML attributes, such as the htmx trigger attribute.
These attributes allow you to customize user interactions and improve the overall user experience of your web applications.
For example, you can use the hx-trigger attribute to specify an event, such as a mouse hover, click, or form submission, that will initiate an HTMX request.
With HTMX, you can also use trigger modifiers to alter the behavior of the trigger event, such as adding a delay before the event is triggered or requiring a double-click instead of a single click.
Let's look at an example!
<button hx-get="/get-data" hx-swap="outerHTML" hx-trigger="click" hx-ext="delay:1000">
    Get Data
</button>
Event triggering example using hx-trigger
To make your HTMX snippets more presentable and adjustable, try SnipsCo, which lets you tweak fonts and sizes for better code sharing.
Here, we have a "Get Data" button that, when clicked, triggers an AJAX GET request to the server.
The server responds with data, and HTMX replaces the entire page with the new response.
We've added a 1-second delay before the event is triggered, demonstrating how HTMX can modify event behavior to suit specific needs.
Try adding further modifications to the example above. You can seek assistance or guidance from here.
Targeting Elements and Swapping Content
In addition to sending AJAX requests and triggering events, HTMX also enables developers to target elements and swap content, creating dynamic web applications without writing complex JavaScript code.
This is achieved through the use of attributes such as hx-target and hx-swap, which allow you to specify the elements that should be updated with the server’s response.
For example, you can use the hx-target attribute to load an AJAX request’s response into a different element from the parent element that triggered the request.
This allows you to update specific parts of your web application without refreshing the entire page, resulting in a smoother and more responsive user experience.
<button hx-get="/load-content" hx-target="#result" hx-swap="outerHTML">
    Load Content
</button>

<div id="result">
    <p>Click the Load Content button to update me!</p>
</div>
Content update example using hx-target and hx-swap
In the code above, we have a "Load Content" button that triggers an AJAX GET request to the server.
However, this time, instead of updating the entire page, HTMX targets a specific HTML element with the id 'result'.
The server's response is then used to update only that specific element, leaving the rest of the page unchanged.
Enhancing User Experience with HTMX Features
HTMX is not just about simplification and streamlining web development – it also offers features that enhance the user experience of your web applications.
From input validation to CSS transitions and animations, HTMX provides a wealth of tools to create engaging and interactive web applications that delight your users.
In the following subsections, we’ll explore these features in detail and discover how they can be harnessed to elevate the user experience of your web applications.
Input Validation
One of the key features of HTMX that enhances user experience is its integration with the HTML5 validation API for input validation and custom error handling.
By leveraging the validation API, you can ensure that user input is properly validated before it’s submitted to the server, reducing the likelihood of errors and improving the overall user experience.
When you fill out a form on a website, like entering your name, email, or password, the browser can automatically check whether you've entered it correctly based on rules set by the website.
For example, it can check whether you've entered a valid email address or left any required fields blank.
To implement input validation with HTMX, you can use the htmx:validate:validate event, which is triggered by HTMX when input elements are validated.
When you interact with a form on a website, like typing in a text field or selecting a checkbox, the browser's validation system (HTML5 validation API) automatically checks if your input follows the rules set by the website.
However, HTMX takes this validation a step further by allowing you to customize the process.
With the htmx:validation:validate event, you can add your validation logic or actions to be performed when the input elements are being validated.
Let's create a basic registration form with custom validation for the password field.
<body>
  <h1>Login Form</h1>
  <form id="login-form" hx-post="/login" hx-target="#form-response" hx-swap="outerHTML" hx-vals>
    <label for="username">Username:</label>
    <input type="text" id="username" name="username" required>

    <label for="password">Password:</label>
    <input type="password" id="password" name="password" required>

    <button type="submit">Login</button>
  </form>

  <div id="form-response">
    <!-- The server response will be displayed here -->
  </div>

  <script>
    // Add custom validation logic for the password field
    document.getElementById('password').addEventListener('htmx:validation:validate', function (event) {
      event.target.setCustomValidity(event.target.value.length < 8 ? "Password must be at least 8 characters long." : "");
    });
  </script>
</body>
Add custom validation logic
In the code above, we have two fields: username and password.
The password field has the same custom validation rule as before, requiring it to be at least 8 characters long.
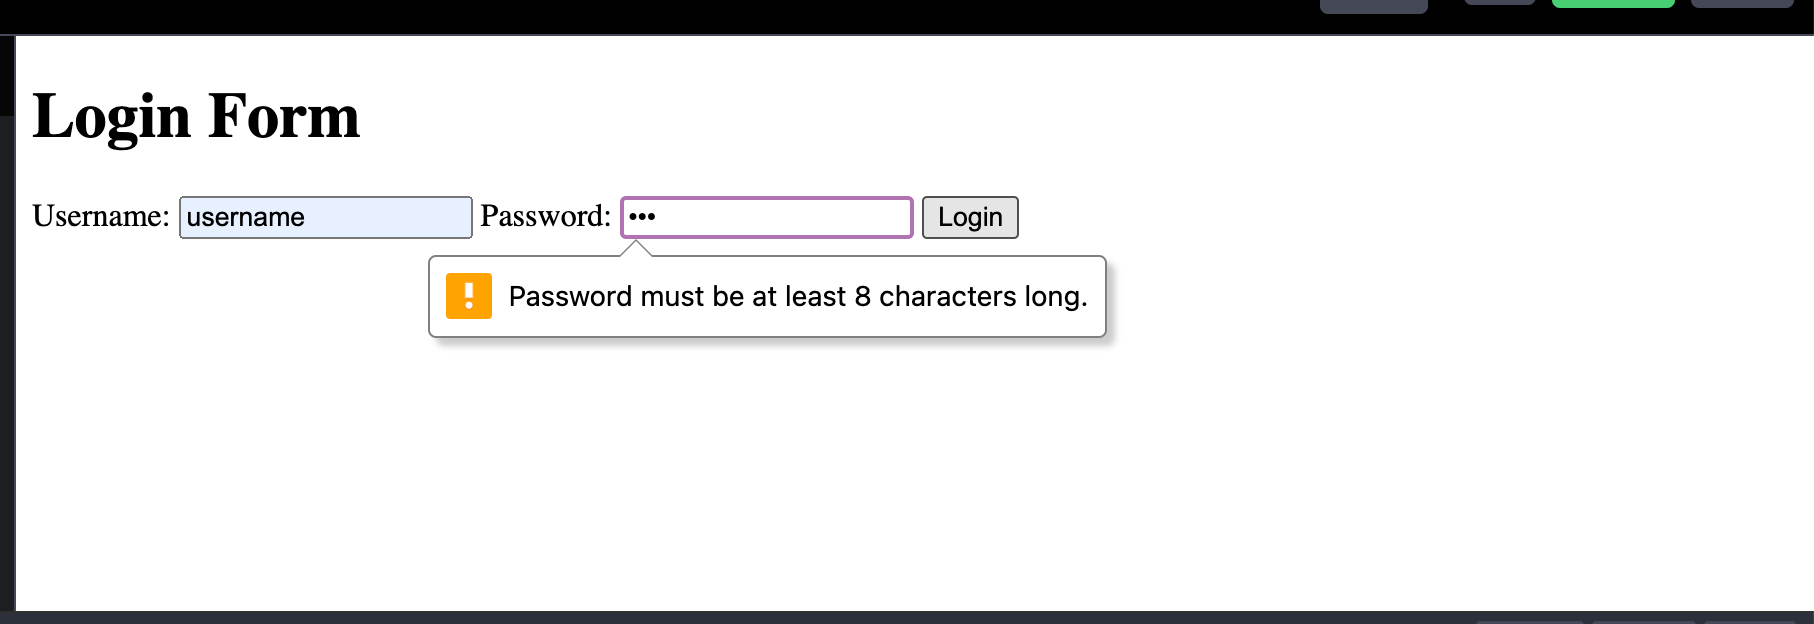
The event listener on the password input field checks the length of the entered password and sets a custom error message using the setCustomValidity method if the password is too short.
If the password meets the requirements, the custom error message is reset, and the form can be submitted.
Again, when the form is submitted, HTMX sends a POST request to the server, and the server's response is displayed in the "form-response" div, updating the content without a page refresh.
Feel free to explore further possibilities with this example. For additional assistance, refer here.
CSS Transitions and Animations
Another powerful feature of HTMX is its ease of implementing CSS transitions and animations, adding visual flair and interactivity to your web applications.
Animations and transitions on your web pages can be created with HTMX, using only CSS and HTML.
Complex JavaScript code is not necessary to complete this task.
To incorporate CSS transitions and animations into your web pages using HTMX, you can leverage the class-tools extension, which allows you to control the actual element triggering an event, providing a high level of customization for the user experience.
But we won't use any extensions right now, here's a simple example of how to use simple CSS Transitions to animate a button:
<!DOCTYPE html>
<html>
<head>
  <title>HTMX CSS Animation Example</title>
  <script src="https://unpkg.com/htmx.org/dist/htmx.js"></script>
  <style>
    /* Define the initial state of the button */
    .btn {
      padding: 10px 20px;
      background-color: #3498db;
      color: white;
      border: none;
      border-radius: 5px;
      cursor: pointer;
    }

    /* Define the transition when the button is hovered */
    .btn:hover {
      background-color: #2980b9;
      transform: scale(1.1);
    }
  </style>
</head>
<body>
  <button class="btn">Hover Me</button>
</body>
</html>
Use a simple CSS Transition to animate a button
Initially, the button has a blue background and slightly rounded corners. The CSS transition defined in the "hover" state is triggered when the user hovers over the button.
The "hover" state changes the background color to a darker shade of blue and applies a scaling transform to make the button slightly larger.
This creates a smooth transition effect when the user hovers over the button.
This serves as a basic example, but don't hesitate to explore different elements and experiment further.
Advantages of HTMX
The primary advantage of HTMX lies in its ability to:
- Simplify web development
- Reduce complexity
- Improve user experience
- Leverage HTML attributes for dynamic behavior
This approach allows developers to create modern, responsive web applications without the overhead of complex JavaScript frameworks.
Consequently, HTMX is an attractive choice for developers who want to create dynamic web applications with minimal JavaScript requirements.
This not only improves your development workflow but also results in more lightweight and efficient web applications, as there is minimal reliance on JavaScript, making it less necessary to write JavaScript.
When to Choose HTMX Over JavaScript Frameworks
Although HTMX is an excellent choice for many web development projects, it’s essential to understand when it may be a better option than traditional JavaScript frameworks.
HTMX is particularly well-suited for web applications that require the following things:
Simplified development: HTMX offers a more straightforward approach to web development compared to traditional JavaScript frameworks.
With HTMX, you can achieve dynamic behavior and interactivity using simple HTML attributes, avoiding the need for complex JavaScript code.
Performance optimization: HTMX's lightweight nature contributes to improved performance.
By relying less on JavaScript and handling interactions with HTML attributes, HTMX reduces the overhead that often comes with using full-fledged JavaScript frameworks.
Minimal JavaScript dependency: HTMX's ability to accomplish dynamic behavior using HTML attributes means you can avoid extensive JavaScript libraries, leading to simpler and more efficient code.
HTML-driven development: For developers who prefer working primarily with HTML, HTMX provides an excellent solution.
It allows you to extend HTML with additional attributes to handle dynamic behavior and interactivity, promoting a more HTML-focused development approach.
All of this results in faster development times, more efficient and optimized code, and a focus on creating engaging and user-friendly web applications.
Summary
In this blog post, we’ve explored HTMX, a powerful library that simplifies web development by allowing developers to create dynamic web applications using only HTML attributes.
Compared to traditional JavaScript frameworks, HTMX simplifies web development and improves performance.
It is well-suited for projects requiring simplified development, performance optimization, minimal JavaScript, server-side rendering, and HTML-driven development.
Frequently Asked Questions
What is the use of htmx?
HTMX is an open-source, easy-to-use, and free JavaScript library that brings the fun back into building robust client-side applications.
It enables developers to access modern browser features directly from HTML, allowing AJAX, CSS Transitions, WebSockets, and Server-Sent Events to be used without relying on Javascript.
htmx is open-source, free, and easy to use.
Does htmx replace JavaScript?
No, htmx is a JavaScript library that allows you to access modern browser features directly from HTML, rather than requiring developers to write a lot of JavaScript.
It is designed to stay within the original model of the web, using HTML and Hypermedia concepts.
How can I install HTMX in my project?
To install HTMX in your project, you can load it via CDN, download the source file, or install it via Node Package Manager (npm).