
Complete Guide to Angular Lifecycle Hooks

Angular is a popular open-source framework for building complex web applications, and one of its key strengths is the ability to control and monitor the lifecycle of components in your application.
This is made possible through the use of lifecycle hook methods, which are events that are called at specific points in the lifecycle of a component or directive.
In this guide, we will take a dive into the Angular component lifecycle hooks and explore how you can use them to manage the application better.
What are the Angular lifecycle hooks?
Angular lifecycle hooks are methods that allow tapping into key events in the lifecycle of a component or directive. These methods can be used to initialize new instances, trigger change detection mechanisms, respond to updates during change detection, and clean up before the deletion of instances.
The lifecycle of a component or directive starts when Angular instantiates the component class and ends when Angular destroys the instance and removes its rendered template from the DOM.
Angular provides lifecycle hook interfaces for all hook methods which makes hook implementation a lot easier.
In this article, we will cover the following lifecycle hooks:
- ngOnChanges - called when an input binding value changes.
- ngOnInit - called after the first ngOnChanges.
- ngDoCheck - implement own change detection mechanism.
- ngAfterContentInit - called after the component's content has been initialized.
- ngAfterContentChecked - called after every check of the component's content.
- ngAfterViewInit - called after the component's views have been initialized.
- ngAfterViewChecked - called after every check of the component's views.
- ngOnDestroy - called just before the component/directive is destroyed.
Before we jump in into descriptions, let's take a look at one picture:
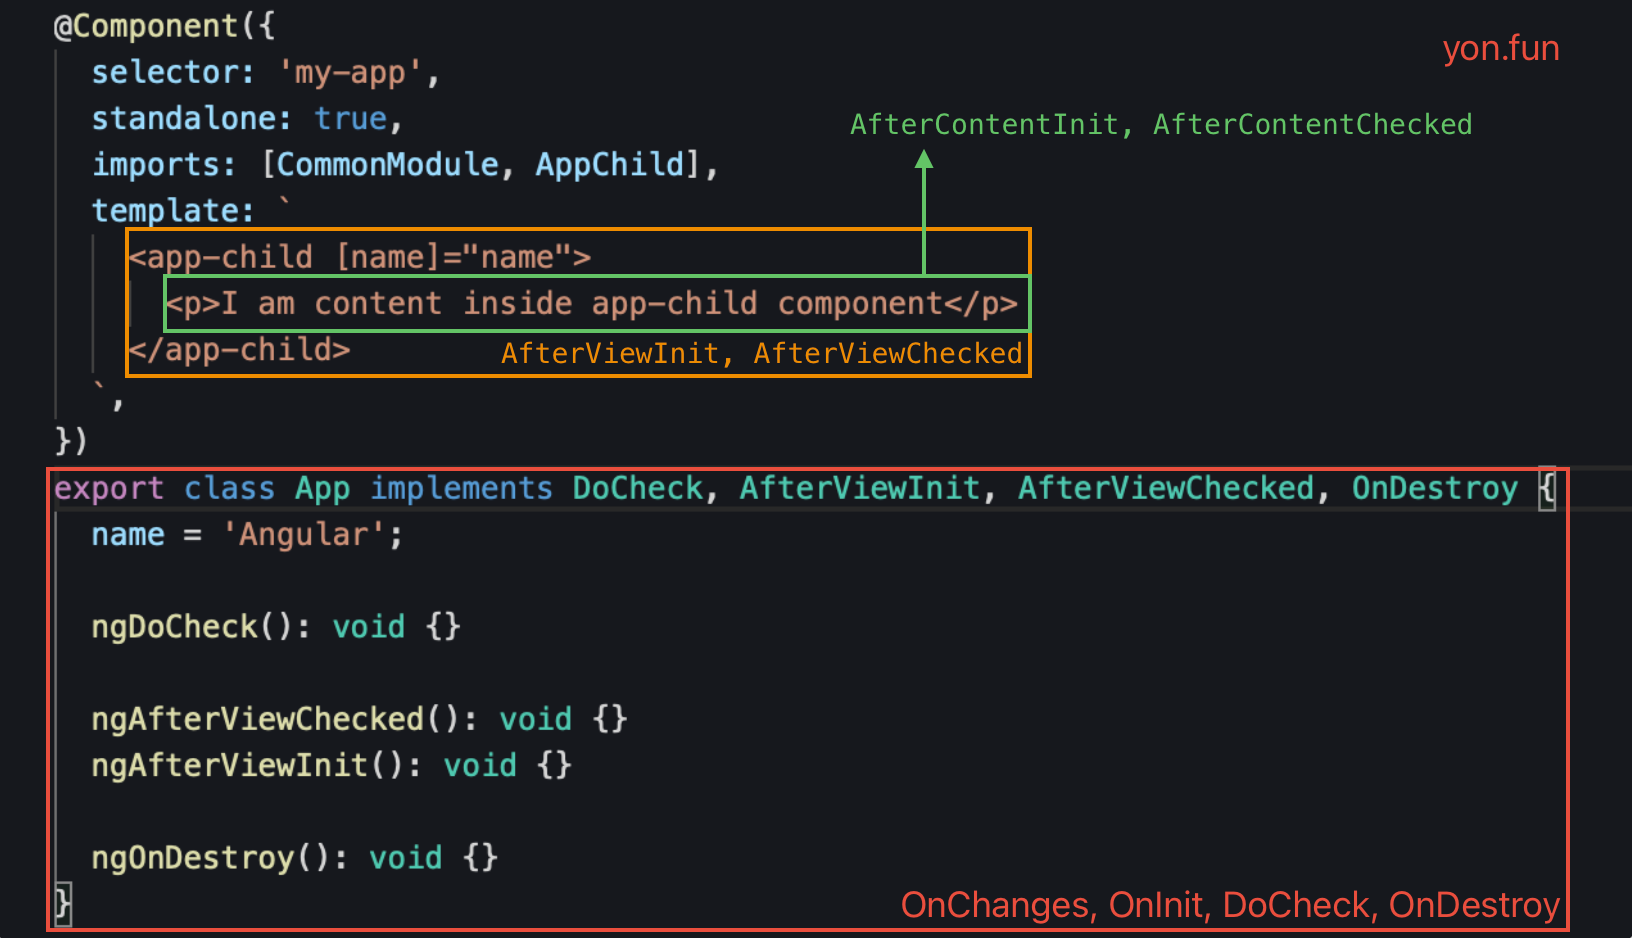
This picture relates to what parts each lifecycle hook is triggered, as we can see, OnChanges, OnInit, and DoCheck hooks are part of the component logic whereas AfterViewInit and AfterViewChecked respond to the component view lifecycle.
AfterContentInit and AfterContentChecked should be inside the app-child component, but I put them here to have a whole picture of component lifecycle hooks.
This is how the app-child component looks:
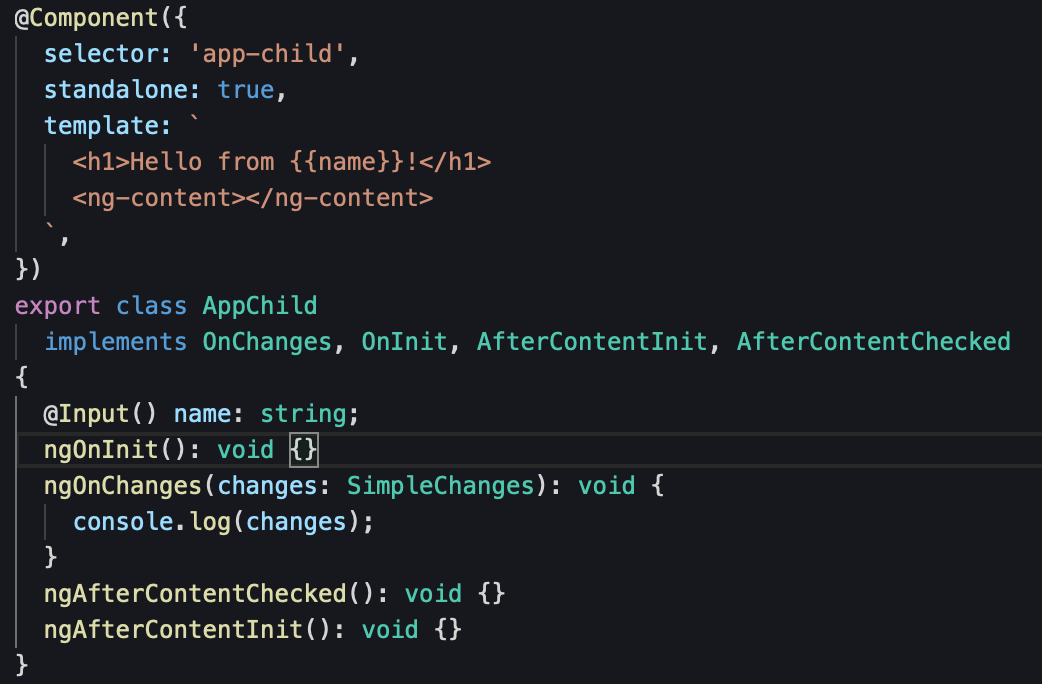
The app-child component template contains the `ng-content` component which projects content outside of its scope, to work with this content projection, AfterContentInit, and AfterContentChecked hooks are the solution.
Now, with the first picture in mind, let's describe all life cycle hook methods one by one, in the order, they are triggered.
ngOnChanges
The ngOnChanges lifecycle hook is called whenever there is a change in the inputs of a component. It is used to respond when Angular sets or resets data-bound input properties @Input() name: string, and perform any necessary updates to the component.
This hook method receives a SimpleChanges object of current and previous property values.
Important to mention, if the component class doesn't have inputs or is used without providing any inputs, this hook method is not called.
It is called frequently, so any operation you perform here impacts performance significantly.
We will go to our app-child component to see how this hook works, here's the code:
export class AppChild implements OnChanges, OnInit {
  @Input() name: string;
  ngOnInit(): void {}
  ngOnChanges(changes: SimpleChanges): void {
    console.log(changes);
  }
}
For now, I removed other hooks and left only OnChanges and OnInit, which are the main subject in this section, we will get back to other hooks later.
Let's assume, the parent component sends 'Angular' to the app-child component input property:
<app-child name="Angular"></app-child>The parent component sends "Angular" to the app-child component 'name' input property. Once @Input() name: string is defined, the app-child component's ngOnChanges hook is called and logs the changes:
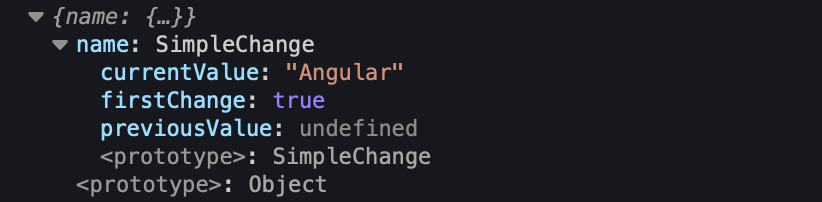
We can see it's firstChange: true which makes sense, previously we just created it without attaching some value @Input() name: string.
Useful information I must say!
ngOnInit
The ngOnInit hook method, on the other hand, is called once, when the component was successfully initialized by Angular.
If the component instance has bound inputs @Input, ngOnInit is called right after ngOnChanges, otherwise angular calls it first.
What does this say? In my opinion, angular checks first the inputs so they can be available inside component initialization, thus if no inputs, angular checks and executes ngOnInit first as no inputs must be checked.
This is a good place to perform any setup that is required for the component, such as fetching data from an API or setting up event listeners.
Let's change a bit our app-child component and see something:
export class AppChild implements OnInit {
  ngOnInit(): void {
    console.log('AppChild initialized.')
  }
}
I've removed all hook methods but ngOnInit, so we'll see a simple message in the console:
AppChild initialized.If we combine the ngOnInit hook with ngOnChanges, things change a bit:
export class AppChild implements OnChanges, OnInit {
  @Input() name: string;
  ngOnInit(): void {
    console.log('AppChild initialized.')
  }
  ngOnChanges(changes: SimpleChanges): void {
    console.log(changes);
  }
}
Assuming the parent component sends something in the 'name' input property, we'll get a bit different picture:
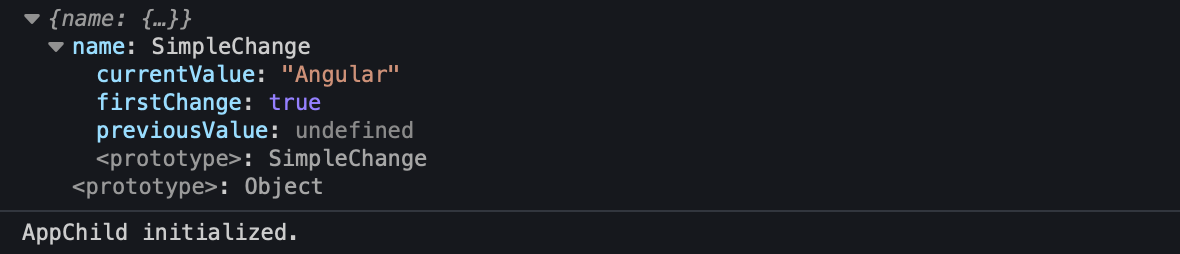
To summarize, angular executes ngOnInit first if no inputs, otherwise ngOnChanges first, and after ngOnInit. Hope this makes sense.
Now, let's go to another important angular life cycle hooks in angular!
ngDoCheck
The ngDoCheck lifecycle hook is triggered during every change detection cycle, and it is used to check for and respond to any changes in the component.
This hook is called immediately after ngOnChanges every change detection cycle, and immediately after ngOnInit the first run. It can be useful to implement custom change detection logic.
The problem
Let's change our examples to understand how it works. By following the best practices for writing an Angular component, we change changeDetection to ChangeDetectionStrategy.OnPush for both, the parent and child components.
Instead of the app-child component 'name' input property, we'll accept now an object called 'app' which has an inside 'name' property.
We'll use FormsModule and add an HTML input element to change the app.name property and see how the app-child component handle changes during the default change detection cycle.
This is the parent component:
@Component({
  selector: 'my-app',
  standalone: true,
  imports: [CommonModule, AppChild, FormsModule],
  template: `
    <input [(ngModel)]="app.name" type="text" />
    <app-child [app]="app"></app-child>
  `,
  changeDetection: ChangeDetectionStrategy.OnPush,
})
export class App {
  app = {
    name: 'Angular',
  };
}
And this is the child component:
@Component({
  selector: 'app-child',
  standalone: true,
  template: `
    <h1>Hello from {{app.name}}!</h1>
  `,
  changeDetection: ChangeDetectionStrategy.OnPush,
})
export class AppChild implements OnInit {
  @Input() app: Record<string, string>;
  ngOnInit(): void {
    console.log('AppChild initialized.');
  }
}
ChangeDetectionStrategy.OnPush means the automatic change detection is deactivated and will run only when data-bound properties change.
Here's what the official documentation says:
Use theOnPush (CheckOnce)strategy, meaning that automatic change detection is deactivated until reactivated by setting the strategy toDefault (CheckAlways). Change detection can still be explicitly invoked. This strategy applies to all child directives and cannot be overridden.
In our case, this means the automatic change detection algorithm won't run every time we change the app.name property, thus we don't see the changes inside the app-child component.
If we write something inside the input, the app-child component doesn't see the changes:

This is because Angular doesn't check the inside objects deeply, for Angular, the 'app' object reference remains the same so no need to check it again.
The solution
Let's see how we can solve this issue with ngDoCheck and ChangeDetectorRef API.
Even though the change detection mechanism is halted, Angular continues to run the ngDoCheck method on every change detection cycle. Therefore it allows us to create a custom change detection and run it just when we need it.
Here's the updated app-child component:
@Component({
  selector: 'app-child',
  standalone: true,
  template: `
    <h1>Hello from {{app.name}}!</h1>
  `,
  changeDetection: ChangeDetectionStrategy.OnPush,
})
export class AppChild implements DoCheck {
  @Input() app: Record<string, string>;
  readonly changeDetectorRef = inject(ChangeDetectorRef);
  private previousName = '';

  ngDoCheck(): void {
    if (this.previousName !== this.app.name) {
      this.previousName = this.app.name;
      this.changeDetectorRef.markForCheck();
    }
  }
}
Note the parent component stays the same, so what's happening inside the app-child component?
We injected ChangeDetectorRef and added a private field previousName, this permits us to mark the view for check just when the app.name has changed.
Inside the ngDoCheck method, we just check if previousName is not equal to app.name, which means the app.name is changed and the view needs to be checked again.
For more info about what is ChangeDetectorRef, see the official documentation page.
Here're our results:

Use it whenever you know Angular cannot handle component's input properties changes, but don't add heavy logic here - ngDoCheck is called continually so it can harm your application performance.
ngAfterContentInit
As Web Components can show projected content using slots, Angular projects external content using the ng-content element.
The ngAfterContentInit lifecycle hook is called once after the first ngDoCheck.
This hook is used to respond to the initialization of the component's content, such as updating the component based on the content. At this time, we already have access to ContentChild and ContentChildren query decorators which are handy tools to work with Angular projected content.
We'll make some changes to our components to see this hook in action. For the parent component, we'll just change the template as follows:
<app-child>
 <p #paragraph>This paragraph comes from parent component</p>
</app-child>
The notable change here is the new paragraph with the #paragraph string token. We'll use it later inside the app-child component.
And here's how the app-child component looks:
@Component({
selector: 'app-child',
standalone: true,
template: `
<h1>Hello from Angular!</h1>
<ng-content></ng-content>
`,
changeDetection: ChangeDetectionStrategy.OnPush,
})
export class AppChild implements AfterContentInit {
@ContentChild('paragraph')
readonly paragraph: ElementRef<HTMLParagraphElement>;
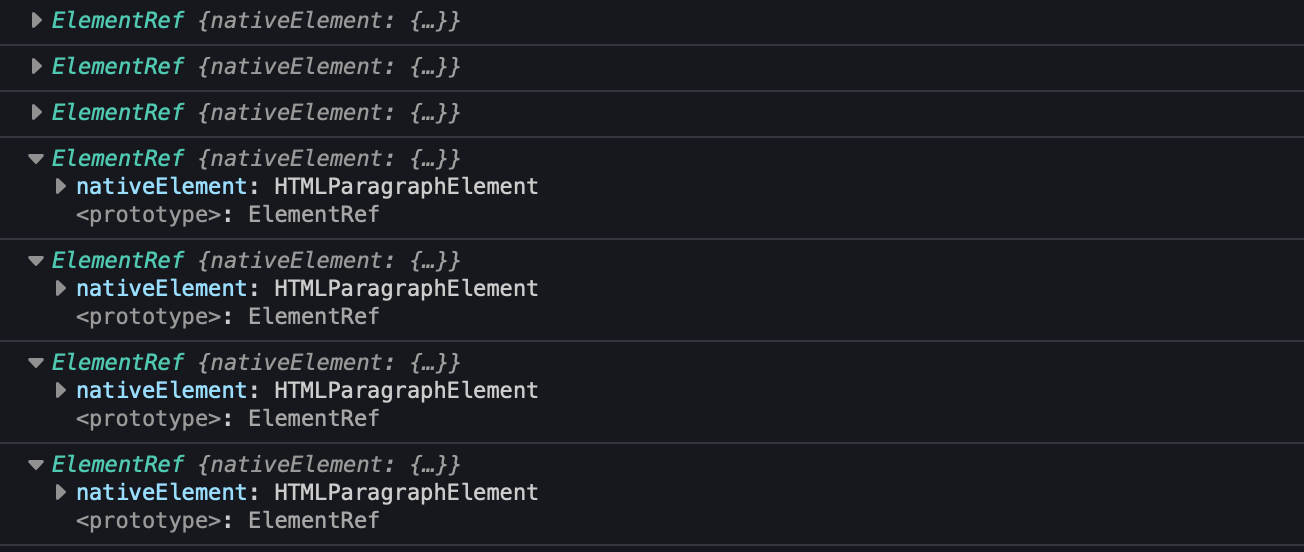
ngAfterContentInit(): void {
console.log(this.paragraph);
}
}And this is the result:

In the nutshell, the app-child component projects content from outside of its scope and show it as part of its component view. If you inspect the DOM, we see something like this:

While h1 is part of the app-child component, the p element is part of the parent component, but both are shown inside the app-child component, makes sense, no?
To work with p within the app-child component instance, we use @ContentChild('paragraph'), when 'paragraph' is the #paragraph string token we added from the parent component.

ngAfterContentInit tells us the content is initiated and we can add more logic based on it.
ngAfterContentChecked
The ngAfterContentChecked lifecycle hook is triggered after the component's or directive's projected content has been checked. Is called after ngAfterContentInit and on every subsequent ngDoCheck.
To see it in action, we'll change the app-child component as follow:
@Component({
  selector: 'app-child',
  standalone: true,
  template: `
    <h1>Hello from Angular!</h1>
    <ng-content></ng-content>
  `,
  changeDetection: ChangeDetectionStrategy.OnPush,
})
export class AppChild implements AfterContentChecked {
  @ContentChild('paragraph')
  readonly paragraph: ElementRef<HTMLParagraphElement>;

  ngAfterContentChecked(): void {
    console.log(this.paragraph);
  }
}
As it runs on every subsequent ngDoCheck this means it runs on every change detection cycle, so we see many console logs:
Make sure you don't add heavy logic here and use it when you want to update some logic and be in synchrony with projected content.
ngAfterViewInit
The ngAfterViewInit lifecycle hook is triggered after Angular initializes the component's and child views, or the view that contains the directive.
Is called once after the first ngAfterContentChecked hook method.
Let's say we want to access the app-child component within the parent component instance, we're using the @ViewChild property decorator and try to console log it, but not before we add the ngOnInit hook to see the difference:
@Component({
  selector: 'my-app',
  standalone: true,
  imports: [CommonModule, AppChild],
  template: `
    <app-child></app-child>
  `,
  changeDetection: ChangeDetectionStrategy.OnPush,
})
export class App implements OnInit, AfterViewInit {
  @ViewChild(AppChild) appChild: AppChild;

  ngOnInit(): void {
    console.log('ngOnInit', this.appChild);
  }

  ngAfterViewInit(): void {
    console.log('ngAfterViewInit', this.appChild);
  }
}
So, what's the result you think?
That's right, appChild is undefined at the component's initialization stage (ngOnInit), it becomes visible only after Angular initiates the component's views:

Use it when you want to access anything from view, such as string tokens - # and any component or directive references.
ngAfterViewChecked
The ngAfterViewChecked angular lifecycle hook responds after the component's view has been checked. This hook is used to react to changes in the component's view, such as updating the component based on the changes.
It's called after the ngAfterViewInit and every subsequent ngAfterContentChecked.
It's the same as the ngAfterContentChecked life cycle hook but responds to only view changes, make sure it doesn't include heavy logic here as well as it's called frequently.
I don't want to bother you with another sample code here, is easy to understand, the same as ngAfterContentChecked but for the component's view.
ngOnDestroy
After ngOnInit the ngOnDestroy life cycle hook is the most used in Angular, it is triggered when a component is about to be destroyed.
This hook is used to clean up resources, detach event handlers, perform any necessary cleanup logic, unsubscribe from subscribed observables, and other things that help to avoid memory leaks before Angular destroys the component or directive.
Let's assume we want to show the app-child component based on conditions:
@Component({
  selector: 'my-app',
  standalone: true,
  imports: [CommonModule, AppChild, FormsModule],
  template: `
    <input type="checkbox" [(ngModel)]="destroyChild" />
    <app-child *ngIf="!destroyChild"></app-child>
  `,
  changeDetection: ChangeDetectionStrategy.OnPush,
})
export class App {
  destroyChild = false;
}
Inside the app-child component, we add the ngOnDestroy hook method:
@Component({
  selector: 'app-child',
  standalone: true,
  template: `
    <h1>Hello from Angular!</h1>
  `,
  changeDetection: ChangeDetectionStrategy.OnPush,
})
export class AppChild implements OnDestroy {
  ngOnDestroy(): void {
    console.log('AppChild is destroyed')
  }
}
Every time when the destroyChild property becomes true, Angular destroys the component, it disappears from view and we see 'AppChild is destroyed' in the console log:

This is a very important lifecycle hook, use it whenever you think you should add some cleanup logic before the component gets destroyed.
Which runs first ngOnInit or ngOnChanges?
In Angular, the ngOnChanges hook runs before the ngOnInit hook.
The ngOnChanges hook is called when Angular detects changes to input properties of the component and is a way to respond to changes in those properties.
The ngOnInit hook, on the other hand, is called once after the component has been initialized and is a place to perform setup tasks such as setting up subscriptions or initializing values.
Because changes to input properties need to be processed before setup tasks are performed, ngOnChanges is executed before ngOnInit.
What is the order of life cycle execution in Angular?
The correct order of execution of a component's life cycle hooks in Angular is as follows:
- ngOnChanges
- ngOnInit
- ngDoCheck
- ngAfterContentInit
- ngAfterContentChecked
- ngAfterViewInit
- ngAfterViewChecked
- ngOnDestroy
Please note that not all hooks are called every time a component is instantiated, and the order of execution can be different depending on the context. However, this is the general order in which these hooks are executed in Angular.
Another good explanation of the sequence and frequency of all lifecycle events, you can find in this Angular Peek-a-boo example.
Conclusion
In this article, we discovered all Angular lifecycle hooks and the differences between them. I put all these examples into a stackblitz project so you can easily navigate through lifecycle hooks and play with them.
Some important notices are to not add heavy logic on hooks that are called frequently, such as ngDoCheck, ngAfterContentChecked, and ngAfterViewChecked, due to poor application performance.
Also, add init logic inside ngOnInit rather than on class' constructor function, the constructor function is called when the component's class is created, and Angular resolves all dependency injections, but the class is not inited yet. So use the ngOnInit method hook for initialization logic, as Angular runs this method when all dependencies are injected and the component is ready to run.
ngOnDestroy is another useful hook, use it to unsubscribe from observables or different types of subjects in Angular, detach event handlers, or in general add some clean-up logic that helps the application avoid a potential memory leak.
By understanding and using Angular lifecycle hooks, you can improve the performance and behavior of your Angular applications, making them more efficient and effective.