
Quick Guide: Building a ChatGPT Plugin in Just 5 Minutes
Discover how to create a ChatGPT Plugin with Cloudflare in just 5 minutes. This quick guide provides step-by-step instructions, from setting up the Cloudflare environment to deploying your plugin. Ideal for developers and AI enthusiasts looking to harness the power of chatGPT in their applications.

In the rapidly evolving world of artificial intelligence, the ChatGPT plugin has emerged as a powerful tool for developers and businesses alike.
Plugins from OpenAI serve as a bridge between ChatGPT and various third-party applications.
They empower ChatGPT to communicate with APIs crafted by developers, thereby expanding its functionality and enabling it to execute a broad spectrum of tasks.
With these plugins, ChatGPT can:
- Fetch real-time data, such as current sports results, stock market values, or the most recent news updates.
- Access knowledge-based resources, like corporate documents or personal notes.
- Aid users in performing tasks, like scheduling a flight or ordering a meal.
However, creating a ChatGPT plugin might seem like a daunting task, especially for those new to the field.
That's where this article comes in.
I've written this guide to demystify the process of creating a ChatGPT plugin and make it accessible to everyone. Moreover, this process will allow us to deploy the plugin to Cloudflare workers and won't take more than 5 minutes.
This is the process I created this simple ChatGPT Plugin that gets information from NPM. It was just for fun. You can try it too.
Prerequisites
Before we begin, make sure you have the following:
- Basic knowledge of TypeScript/Javascript
- Node.js and npm installed on your machine
- ChatGPT Pro plan - as I remember only pro users can use plugins (for now)
Step 1: Create the Project
Recently, the Cloudflare team updated their CLI and added the ability to create a chatgpt plugin.
For us, this is what we want, it does the folder structure and adds everything it needs to be deployed on Cloudflare workers.
So let's run this simple command:
npm create cloudflare my-chat-gpt-pluginNext, CLI will ask what type of application we want to build:
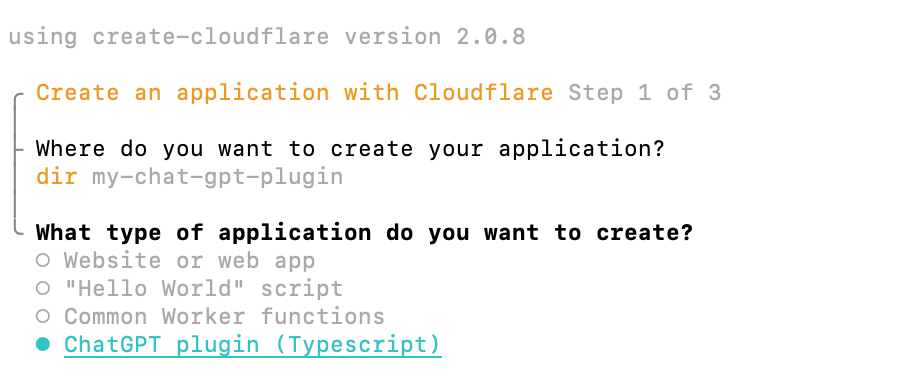
Of course, we choose ChatGPT Plugin (Typescript).
Click Enter!
The CLI will create the application, install the dependencies and ask you if you want to deploy it. I usually choose "yes", as this step will log in me to Cloudflare Workers, and will make sure everything is good for deploying the plugin, even before adding some logic.
In your case, it would ask you to create an account if you're not logged in, so I'd suggest also choosing "yes" at this step.
Congratulation, now you have a ChatGPT plugin structure you can work with, moreover - deployed to Cloudflare Workers.
This step took us no more than 1 minute.
Step 2: Setting Up the Routes
It's time to add our logic!
Let's check the default examples CLI provides us and see what we can learn from them.
At first glance, if we open src/index.ts, we can see it imports @cloudflare/itty-router-openapi. This is a library that helps in creating OpenAPI documentation for itty-router applications.
It is a part of the Cloudflare ecosystem and is designed to work with the itty-router - a tiny router for Cloudflare Workers and service workers.
We won't describe itty-router-openapi in-depth here, but you should definitely see the documentation page, to better understand how to properly set up the routers for OpenAI plugins.
A good example here is src/search.ts, which is imported in src/index.ts and served at /search route:
import { OpenAPIRouter } from "@cloudflare/itty-router-openapi";
import { GetSearch } from "./search";

export const router = OpenAPIRouter({...});

router.get("/search", GetSearch);
Configure OpenAI Router
A good note here is to provide a good schema for GetSearch class, such as shown in the example:
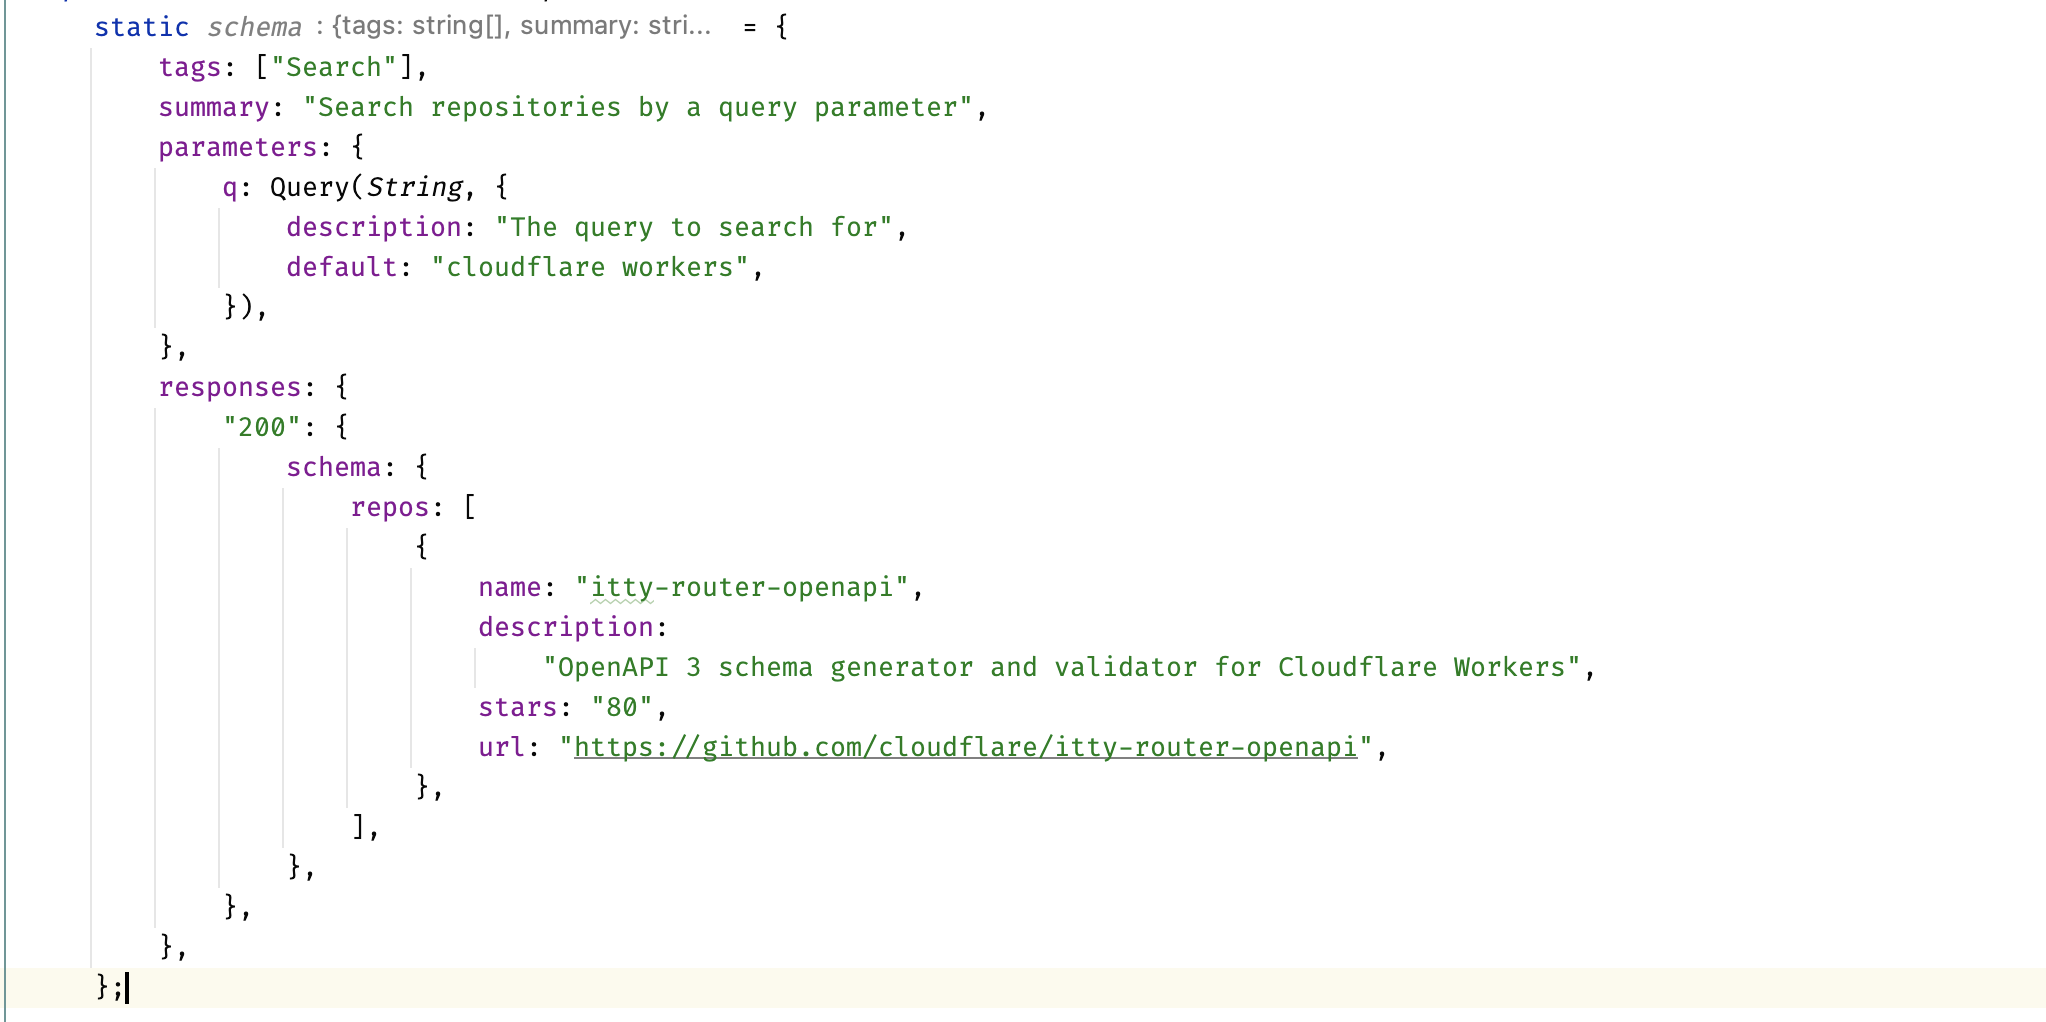
Again, see the previous link I provided for more documentation on this schema, it's extremely important to deliver relevant information to ChatGPT, so it'll understand what's the route about and what it can do with it.
This step can take a lot of working hours, it depends on your implementation, but for our simple example, no more than 3 minutes!
Step 3: Deploying to Cloudflare
After we defined our routes and implemented ChatGPT logic, it's time to deploy the plugin to Cloudflare.
If you'll open package.json, you'll see a deploy command, so let's run it:
npm run deploy
This command will bundle your application and deploy it to your Cloudflare account. Make sure you've set up your account credentials in the Cloudflare CLI before running this command.
Congratulations! 🎉 🎉 🎉
Now you have your ChatGPT plugin ready to be used inside ChatGPT!
After a successful deployment, you should get a response like this, in your terminal:
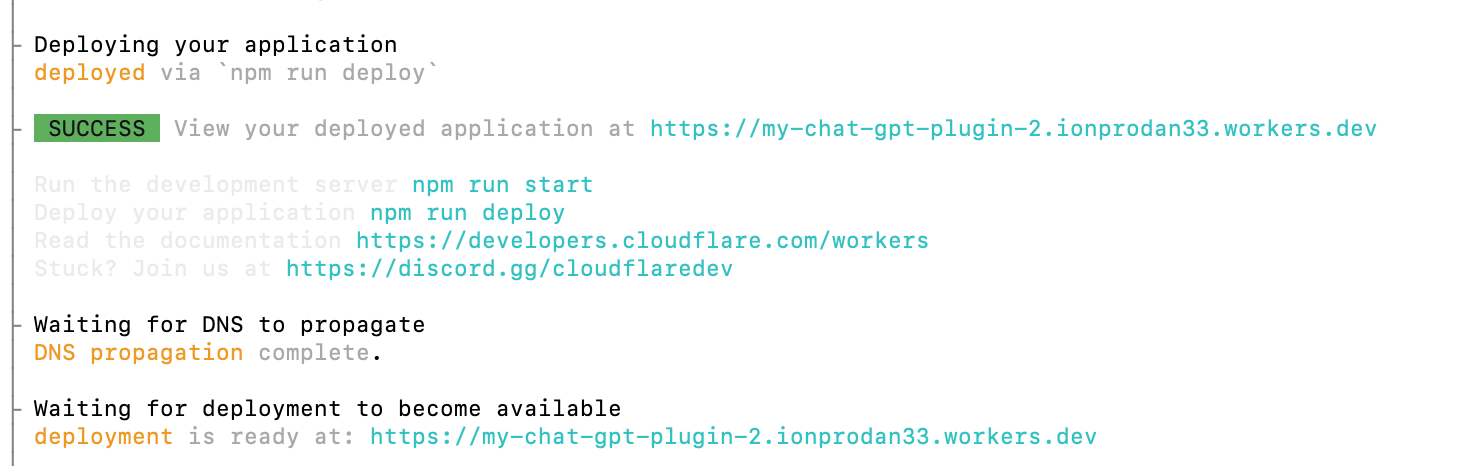
Remember the link, the one that's in blue and starts with https://, we'll need it for the next step!
This step is usually very fast, but we'll add here another minute, so the whole process took us no more than 5 minutes 😎.
Step 4: Testing Out your ChatGPT Plugin
This step is where we have the most fun.
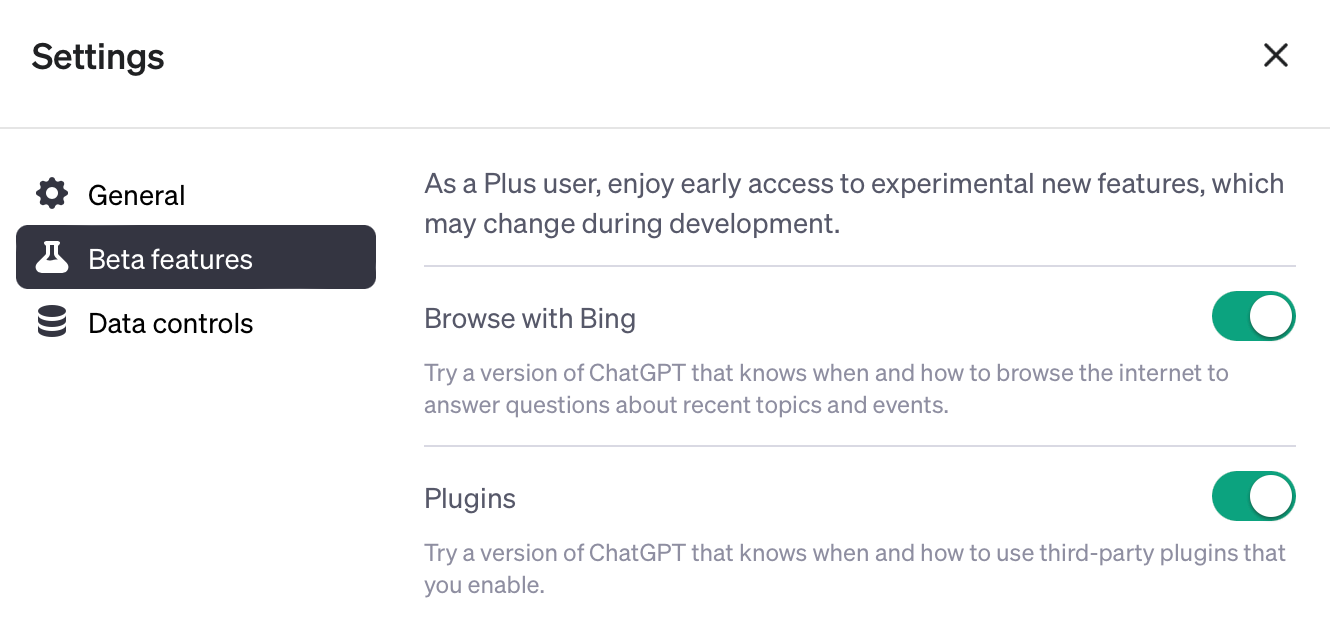
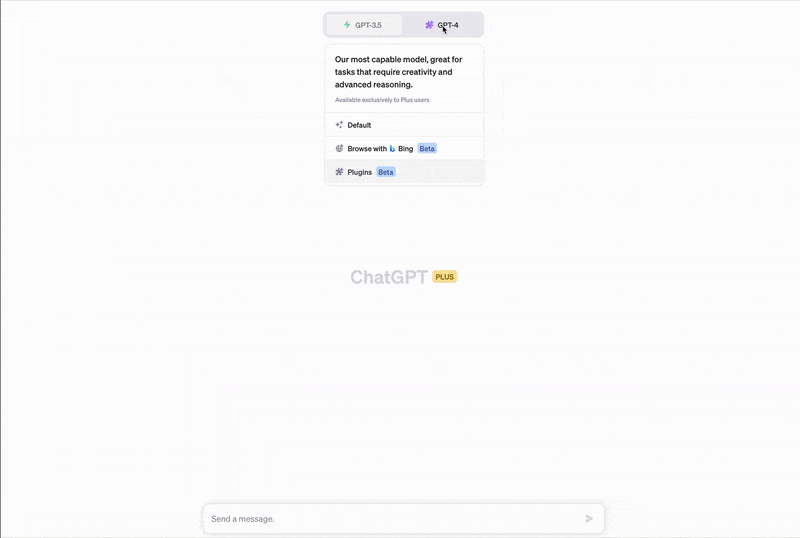
Before jumping to testing our plugin, make sure you have plugins enabled, go to your account->settings->Beta features and switch plugins on.
Now we are ready to go!
Follow these simple steps to open the modal to install our plugin:
Once you have the modal opened, copy and paste the link from deploy, like this:
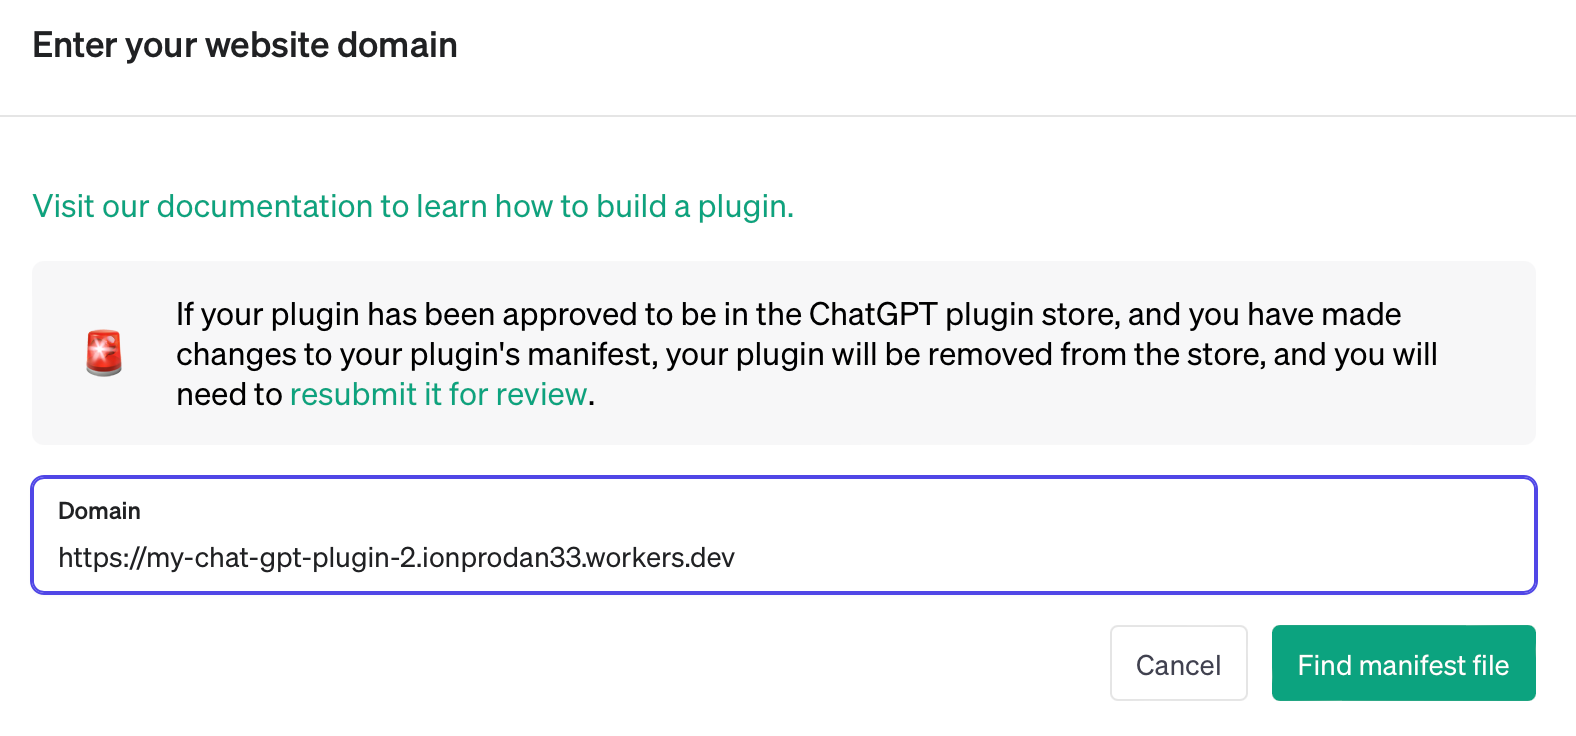
Click on "Find manifest file".
If all is good, you should see something like this:
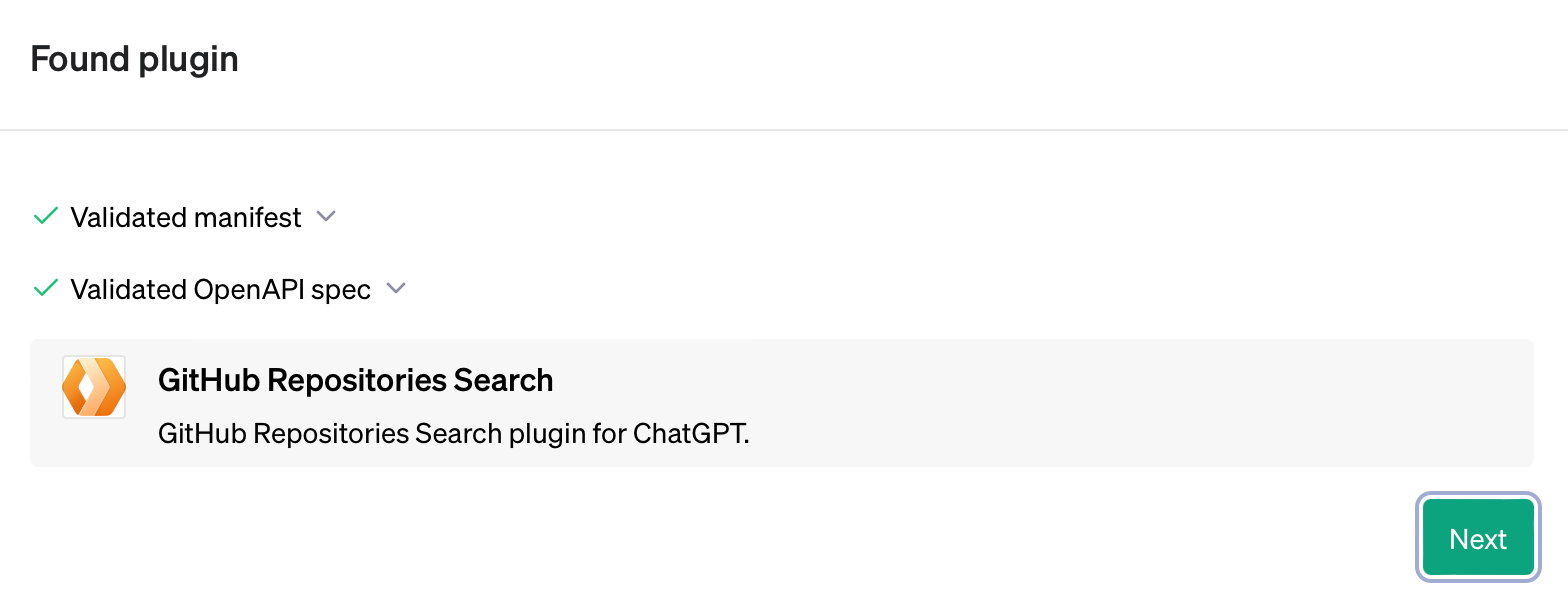
If not, it'll show you the issues your plugin has and how to solve them!
For now, click on the "next" button, and all the next "green" buttons! 😎
See the magic 🧞♀️.
Here's where our steps are complete, after activating your plugin, you can talk with it and do tests!
Congrats 👏🏻 you've done a good job!
Conclusion
In conclusion, the creation of a ChatGPT plugin doesn't have to be a daunting task.
With the right tools and guidance, you can create a plugin in just a few minutes.
This guide has walked you through the process, from setting up your project to deploying your plugin to Cloudflare.
Now, you're equipped with the knowledge to create your own ChatGPT plugin and harness the power of AI with your applications. So, why wait? Dive in and start creating your own ChatGPT plugin today!
Happy coding!